
The Mega Sketch is a computer controlled drawing robot built around open source designs and software. This is a great starting project for hobbyists and students interested in 3D Printers, CNC Routers, and Laser Cutters. The parts, designs, and code used for the Mega Sketch are closely related to those found in these other machines.
Difficulty: Advanced
Build Time: 1-2 hours
Instructions
Below you can find a series of pictures and short video clips explaining how to build your kit. You'll need a small screwdriver set and some wire strippers to assemble the project.
*** Please note, we're in the process of revamping this kit. A couple of parts may look slightly different in your kit, and we've cut down on the number of TYPES of screws in the kit. This means we've replaced some oddball screws with ones we're already using. (Instead of a single 18mm Screw we just went with another 20mm screw. This just makes packaging easier as well as saves some confusion when building.)
Buy
Mega Sketch Kit
Lesson Plans
Check back, lesson plans will be available soon.
Instructions, continued
- Gondola
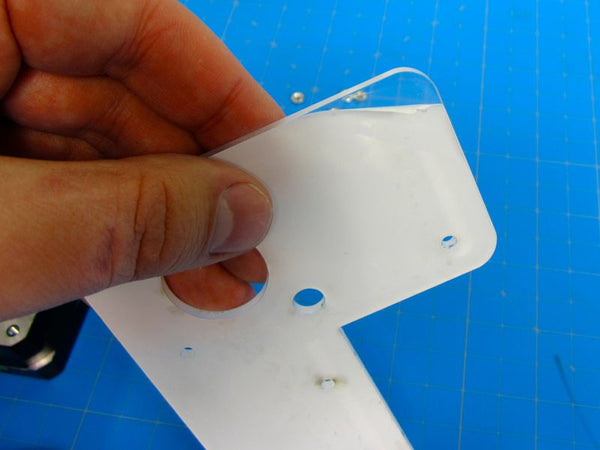
Start by making the Gondola Pen Holder and main body. Locate the following acrylic parts.


Remove the protective plastic backing.
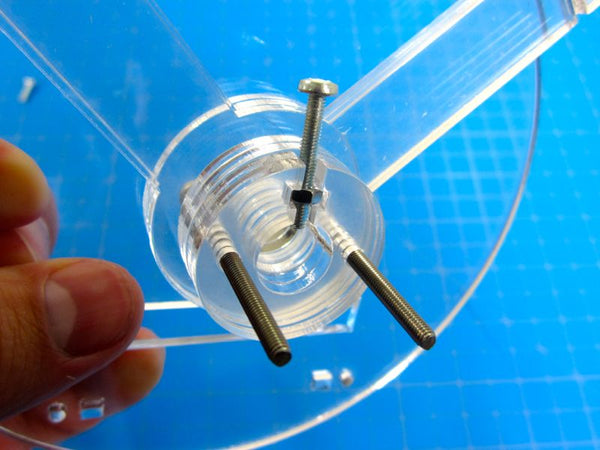
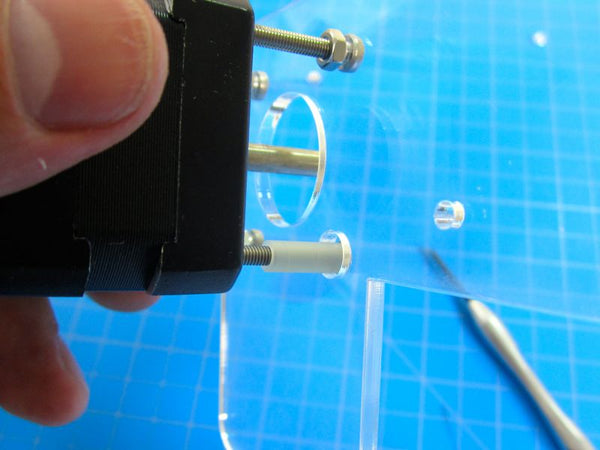
Gather all the circular pieces and two M3 40mm screws (the longest screws you'll have).
Put the screws through your very large circular Gondola piece, then start stacking the smaller pieces in this order.
One large circle, the two V shaped wings, two small circles, and the two small circles with the T nut cut out.


Take a M3 20mm screw (there should be only one in the kit) and screw a nut onto it about half way. Fit it into the T nut holding area in the circles.
Now place the other two small circles and finish with the remaining large circle. Secure with two nuts.

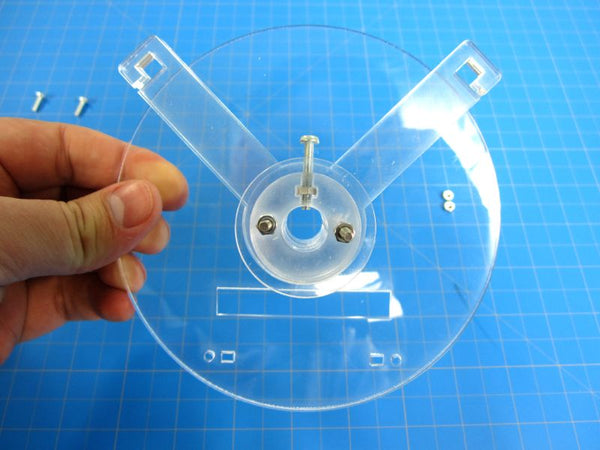
Now lets make the servo holder and attach it to the main body.
Grab your Servo, a single servo screw (found in the servo bag, there will be several), the Servo Foot, two M3 8mm screws, two M3 20mm screws, and four nuts.
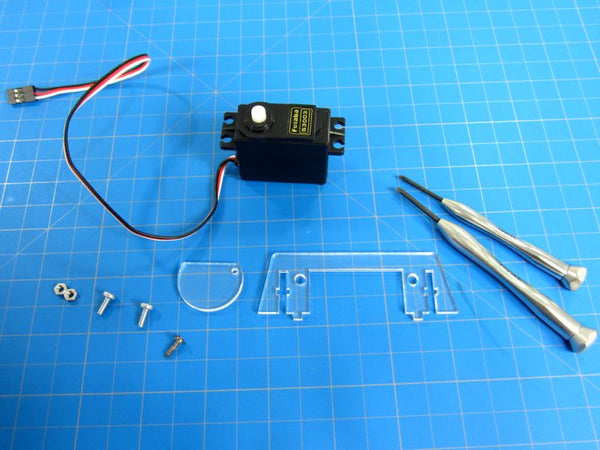
Start by removing all the white plastic coverings on the back, same as before.
Grab the Servo Foot and one Servo Screw. Securely screw the foot to the servo. Make sure it's a right fit.

Make sure your foot has a good range of motion. It should be able to move to these two potions, as shown above and below. If not, unscrew some and change it's position.

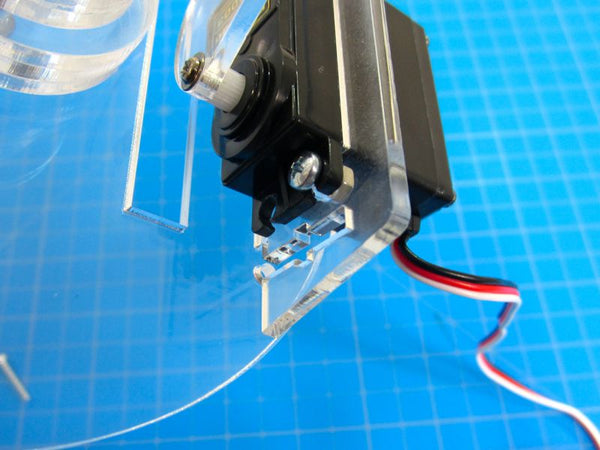
Now secure the Servo to the Servo Holder using your two M3 8mm screws and nuts. The servo wire should be going to your left, be sure not to put the servo in backwards.

Attach the Servo Holder to the Gondola using the two M3 20mm screws and nuts.

You are now done with the Gondola.

- Stepper Motor Holders
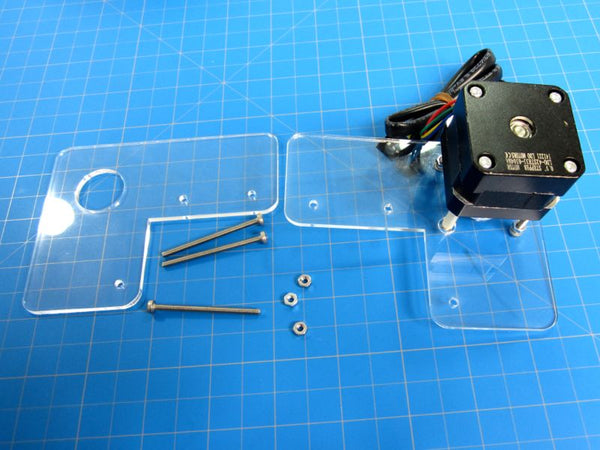
You'll need your two stepper motors, eight M3 20mm screws, some nuts, the two half inch nylon white spacers, and the acrylic pieces. They're the L shaped pieces. (Or similarly shaped pieces in the updated version.)

Start by removing the protective plastic on the back of the pieces.
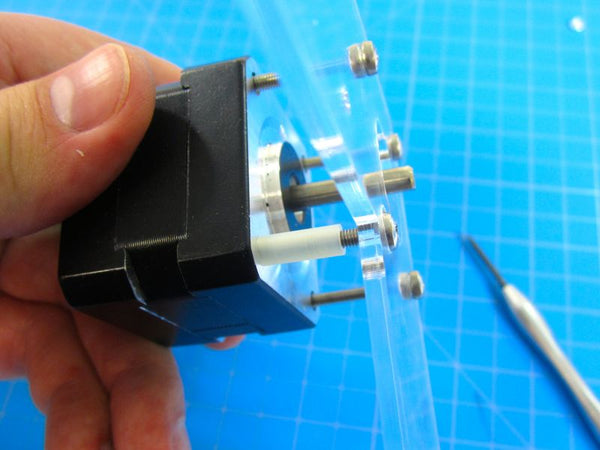
Put thee M3 20mm screws around the center hole. Apply a nut to them and twist it down until it's NEAR the bottom. Don't screw it into place.

Screw those three screws into your Stepper Motor. Screw them in until the hit the bottom. It's handy to have the Stepper Motor's wire coming out the top.

Before doing anything else, use your fingers to move the nuts so that they clamp onto the acrylic.
Grab another M3 30mm screw and put the spacer over it. Then screw it into the remaining hole on the Stepper Motor.
Do this entire process again with the other stepper motor. Notice that the two setups are mirrored.

Now lets attach the Stepper Motor teeth. You'll need the two teeth, the small hex wrench, and two of the very very small black plastic screws.
Put the Tooth over the Stepper Shaft, and move it down towards the motor base. Put a plastic screw onto the hex wrench, and screw the Tooth into place.


Now grab some more M3 30mm screws and remaining acrylic pieces. Line them up with your Stepper Holders and assemble as follows. This creates a clamping system which allows for easy attachment to white boards, easels, and whatnot. If you're not going this route and want to instead perminately attach the Steppers to something (say a wall), use wood screws or drywall screws through those same holes.


- Water Bottle Holders
For everything to work right we need to set up counter weights. Water bottles work well, as does a bag of nails. We prefer water bottles since they're easy to transport and easy to change weight. Typically we fill up our bottles about a quarter full. It doesn't matter all that much provided both sides about equal.
You'll need the following items. Two water bottles, four M3 20mm screws, four nuts, acrylic pieces.

Remove plastic backings,
Attach the two acrylic pieces together as follows using the screws and nuts. Do not screw them down tight, the acrylic should be able to move back and forth freely.


Attach this to the top of your water bottle, push the pieces together so they clamp onto the neck, and tighten the screws to secure.
Now grab your toothed rubber belt. Cut it in half if you've not done so already. You want two equal pieces.
Attach it to the Water Bottle Holder as follows.


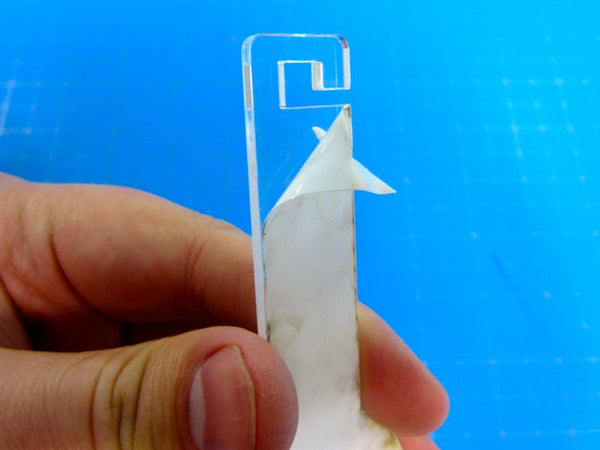
Secure it in place using the little S shaped acrylic piece. Thats our belt tightener.

Repeat this process again for the other holder.
- Arduino Holder, AKA Brain Holder
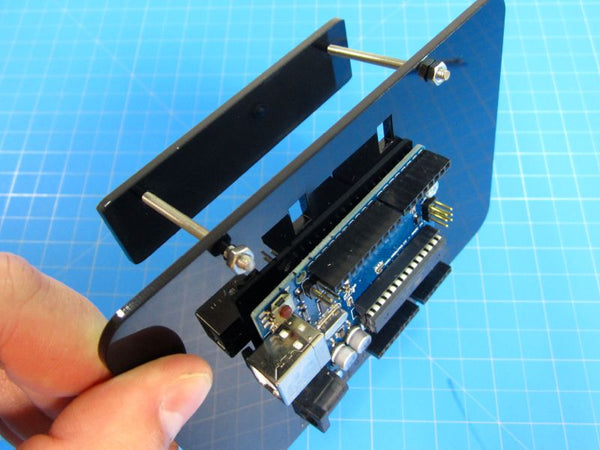
You'll need the Arduino, the two black acrylic pieces, your remaining screws and nuts.
We gave you four screws for the Arduino, but two is more than enough to secure it in place.
More or less we're using two scores to attach the Arduino to the large black piece, and then making another clamp using the small black piece. Or you can mount this directly to a wall if you'd like.


- Wiring Things Up
Place the Motor Shield on top of your Arduino.
Cut off and strip the ends of the wires that come off your Stepper Motors. Attach them to the Motor Shield as follows. Make sure the wire colors match up.

At this time attach the 2.5mm Female Power Cord, and the servo extension cable as well. Be sure to line up the Positive Red + wires and Negative Black - wires appropriately.
On the black Arduino mount are two slits. Feel free to weave the power cable through those slits in order to prevent any stress or cable damage.
Done with wiring, provided you eventually plug the wall power adaptor into place, plug it into your computer, and attach the servo extension cable to the servo wire.
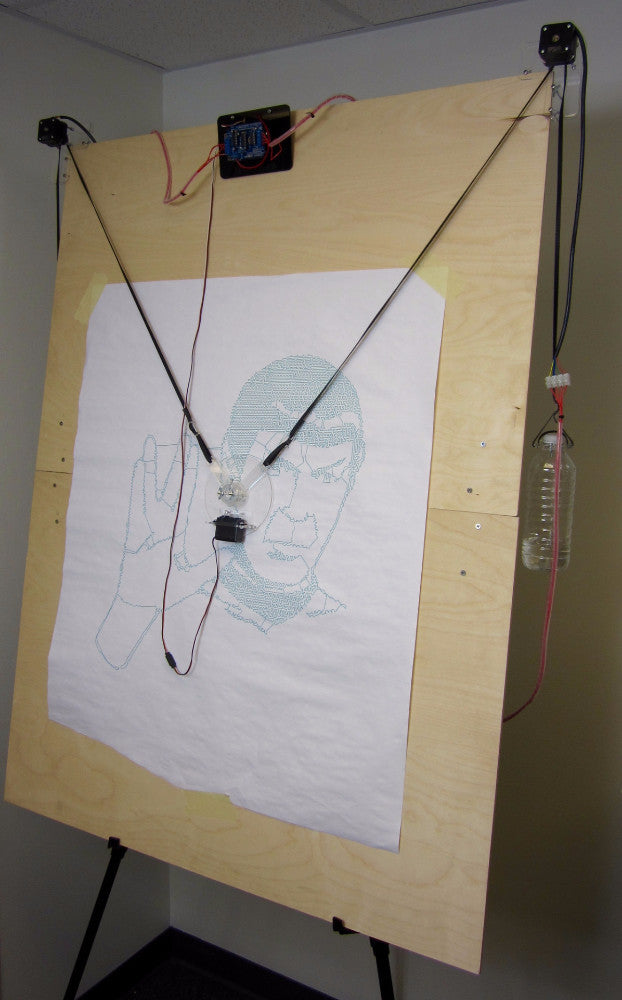
- Attaching to a Board
We typically attach our Mega Sketches to a large board on an easel. We're using a 4 x 3 piece of quarter inch wood. Using something smaller is fine as well. If you want to attach this project to a LARGER surface you'll need longer belts, cables, and wires.
With the current setup it helps to have the Arduino/ Brains in the center of your board, mainly due to cable length. (If you want longer stepper motor cables just use some cheap 4 port screw terminal blocks and a spool of wire.) This may require you to get a longer USB cable or USB extension cable.

Use the two remaining acrylic S shaped belt tighteners to attach the belts to the Gondola.

Now lets put some software on a computer and get this thing working.
Software
There are several open source software solution to use with the Mega Sketch. Our recommendations and install instructions for these pieces of software can be found below.
By default we like to use the open source Makelangelo software. To do that you need to follow the directions to load the appropriate software onto the Arduino. Directions can be found here. Very bottom of the page on that link.
Before doing anything download and install the following onto your computer.
Java - Update to latest version. Software won't work without it.
Arduino IDE - Helpful for troubleshooting and you may need additional the additional drivers if you're on a Windows Machines.
Alternative software we recommend (for super advanced DIY people) is the Polargraph software.
Plug your Arduino into your computer. Windows may try and auto install drivers, let it do so.
***
To use the Makelangelo Software just double click the Makelangelo.jar file inside the folder.
If it's your first time, choose a language option.
Go to Connect. You should see an option below. On a Windows Machine this will appear as "Com3" or "Com4" (or some Com with a number next to it). On a Mac it'll show up as a USB Modem.
When you choose the option to connect to you SHOULD see several things happen. On the right of the screen you'll see text come up saying you've connected. You should also see and hear your steppers and servo move slightly. (Did you plug your Arduino Motor Shield into your AC adaptor? Did you plug the servo extension cable to the board and to the servo? Is the USB cable connected? Check those things first before freaking out.)
- Machine Settings
We need to put in some options so the machine knows the size of our workspace and the size of our paper.
Go to Settings -> Adjust Machine Sizes
Input the size of the workspace and size of your paper in millimeters.
Measure from one nylon spacer to the other on your steppers. This is your Machine Width setting, and it's very very important to be exact.
Enter in your Paper Width and Paper Height, also in millimeters.
Next, lets set up our pen. Depending on how thick your writing tool is the software will change how it translates images.
Go to Settings -> Adjust Tool
We prefer to use a fine tipped sharpie. Their point is about 0.3mm in diameter, but we typically set our diameter at 0.5mm.
Next, we need to fine tune our Servo so that it lifts the pen UP and DOWN.
The numbers next to UP and Down in the Adjust Tool section represent positions of the servo. Try hitting TEST next to the UP setting.
You'll see the servo move. Ideally the Servo Foot should be pushing the Gondola away from the paper. Hitting TEST on the DOWN setting should have the Servo Foot not touching the paper at all, so the Gondola is touching the paper completely.
We prefer to have our Servo Speed at around 50. Slower is better we've found.
It's almost guaranteed that the settings won't be right for your servo. Adjust the numbers and try testing until you're happy with your UP and DOWN settings. Remember, you can always change these later.
- Printing Something
Once your settings are done we can start drawing something.
Put a piece of paper in the EXACT CENTER of your work space. (Or pretty exact.)
Next, using the manual movement buttons on the right (Y and X), start moving your Gondola around. Move it so that it's in the exact center of your paper.
** If for some reason it's not moving properly, or moving oppositely, go into the Machine Settings and try inverting one of the Steppers
Hit the "Set Home" button. You always way to do this before starting your prints. This tells the computer that THIS spot is the middle of your paper, and to base everything off this setting.
Hit the "Pen Up" button. Put your writing tool into the Gondola and screw it down tight.
If you're using a fine tipped Sharpie, it will look something like this. Be sure that "Pen Up" means your pen isn't touching the page, and "Pen Down" has it securely touching the page. If you're doing this on a white board, same things apply.


Go to GCODE -> Convert Image
Select a jpg file from your computer.
Choose a style option and your Pen. (The one you set up before.)
Go to Draw -> Start.
- Trouble Shooting
Arduino Won't Connect
Make sure all drivers are installed. Try taking the Motor Shield off and seeing if it'll connect.
Arduino Does Show Up in Software
Quit the program. Unplug and Replug in the Arduino. Open the program again.
Movement is backwards, not moving right direction.
In Machine Settings try inverting one of the steppers.
Not drawing strait lines, warped images, and so on
Double check all your Machine Size settings. Measure from the Nylon Spacers, NOT the center of your Stepper.