
AA Solar Charger in Altoids Tin

Cost: $5
Time: 20 Minutes
Difficulty: Very Easy
STEP 1: Gather Materials
Supplies:
4V or greater solar cell
AA or AAA battery holder
1N914 Blocking Diode
Altoids Tin to house it in (or whatever)
Tape
Tools:
Soldering Iron
All the supplies for this project can be found at my website, BrownDogGadgets. 90% of the money goes to me making more projects, the other 10% goes for dog treats and the occasional stuffed frog toy.

STEP 2: Cells and Charging
Almost all rechargeable batteries you buy in the store are NiMh batteries. Usually people use a wall adapter to quick charge them in an hour or so, but we're not going to be that fancy. We're going to use the "trickle" method to slowly charge them up over time. This also prevents them from overcharging or getting destroyed.
To be safe we need to be sure that we're not throwing more than 10% of their capacity at them when charging. For example my AA batteries have a capacity of 2,000 mah. The max I can charge them at is 200 ma.
When you decide what solar cell to use make sure you're not going over the 10%.
At the same time be sure that you're getting at least 3.5 volts out of your solar cell otherwise the batteries won't charge. Remember, the more voltage your cells put out the less sunlight you'll need to reach your minimum voltage requirement. (Higher voltage cells = more charge time, even in low light.)
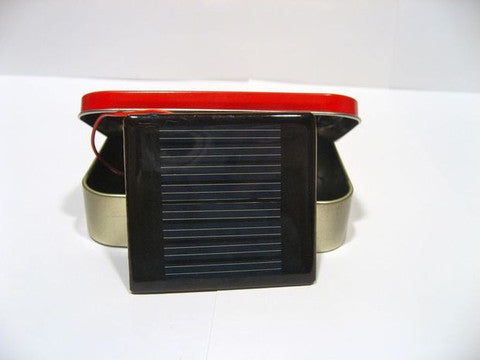
For this project I've chosen some 4V cells that put out 50 ma. I picked it because it's just the right size to fit into the Aloids tin. If you pick a bigger sized cell you can always glue it onto the outside of the tin.
You could also use a combination of smaller cells. I've used combinations of little 1.5V and 2V cells in series to get my desired voltage levels, while still fitting inside the tin.

STEP 3: Hook Up the Diode
We need a blocking diode. This prevents the solar cell from sucking power out of the batteries when in darkness.
The 1N914 is a good diode as it has a very low voltage drop and is very common.
You want to connect the red wire from your battery holder to the black bar leg of the diode.
BLACK BAR LEG.
Otherwise you'll not get any power from the solar cells.

STEP 4: Solder the Solar Cell
Now heat up your soldering iron.
Solder the other leg of your diode to the positive solar point.
Solder the black wire from your battery pack to the negative point on your solar panel.
Don't forget to solder the red wire to the diode.
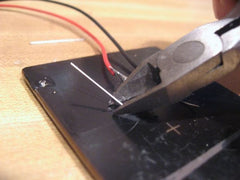
Snip off the extra bits of the diode.
Lastly you can use some tape to keep it all together. Hot glue/ melt glue also works. We'd hate to rip out the wires by mistake.


STEP 5: The Battery Pack
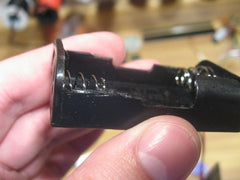
I find it helpful to snip off the tops of the battery holders. All the ones you find in stores have these horrible plastic "guards" on them. they're great at keeping batteries in, and a pain to get batteries out. As we're wanting to do a lot of battery switching removing them isn't a bad idea.
I like to use double sided foam tape to keep my battery packs down. You can use hot glue/ melt glue if you want. Heck you might not even need to use anything as the battery pack is nearly a perfect fit inside the tin.
Well just put it in and see how it works.


STEP 6: Enjoy!
And that is it. We're done. The best part is that the solar cell fits perfectly inside the tin so we can shut the top. No one would ever know that we've got a solar charger inside.
If you really wanted to be crazy you could put a little charge indicator light in there, or a test LED.
I hope you found this helpful. These are easy to make and are also really fun to give away as gifts, especially to people who are always on the road.
If you'd like parts or a fully made charger you can grab one at my websiteBrownDogGadgets.
***Several people asked me to put together a kit with a bit of a discount, so here is that kit!

Here is a PDF with more pictures on how to build this USB Travel AA Altoids: Travel-AA-Solar-Charger-Altoids.pdf